
Short Hair Talk
- Sarah Bryant
- Jan 3, 2020
- 6 min read


Whether you’ve been wanting to cut your hair for a while or you’ve already cut it but no stylist has seemed to get it quite right, communicating what you want is key and that is what this post is all about.
My cut would be described as an undercut across the board, but the term "pixie" can be controversial as some believe pixies are only close-cropped cuts. So asking for an "undercut pixie" can mean entirely different things to different people. My hope is that after reading this post, you'll be able to better communicate and decide on exactly what you want out of your cut.
First things first, you’ll need to decide on a length. Now with undercuts like mine where the sides and back are shorter than the top, you’ll need to decide on two lengths- one for the undercut and another for the top.
If you are making a more drastic cut, I would recommend leaving the top about chin-length for the first chop (but if you want to go for it and get a close crop then by all means you go for it!!). I only recommend keeping the bang section chin length so that you can still flip it if need be- I personally have to be able to flip my hair or else I wouldn’t know what to do with my hands!
When Michele cut my pixie the first time, I brought a ton of inspiration photos that I’d found on Pinterest and instagram like the ones below. Luckily Michele and I already had a pretty close relationship back then and she knew to cut it in baby steps essentially she let me warm up to a pixie.


For our first cut she left the top and sides long enough to tuck behind my ears (that way I didn’t miss a ponytail too badly) and cut the nape of my neck with scissor over comb to get a close cut, but still keep it soft.


My first ever pixie 360 on the left, and then bleached out on the right.
I had already been seeing Michele for cuts and colors for over a year by the time we cut my pixie, so we both had a good grasp on each other’s styles - this is key when you are changing up your look. You want to make sure you and the stylist can communicate well, something that can take years to build up or you can just get lucky and find ‘the one’ for you. If you are going to a new stylist, or haven’t been seeing them for very long then YOU HAVE TO COMMUNICATE! With words, with pictures, with videos, pretty much every way possible. Your best bet is to bring in videos of the cut you want, and if that isn’t possible then bring a ton of pictures. I have an old video of Michele cutting my hair here if you want a reference. When I brought my initial Inso pics, they weren’t necessarily the exact cut I wanted, but each had a piece of what I was looking for. I’d say “I like the bang length of this one, and how piecey this one looks, and the length of the undercut on this one”. Communication really is key and if you don’t feel heard or listened to, then you may want to hop out of that stylist’s chair.
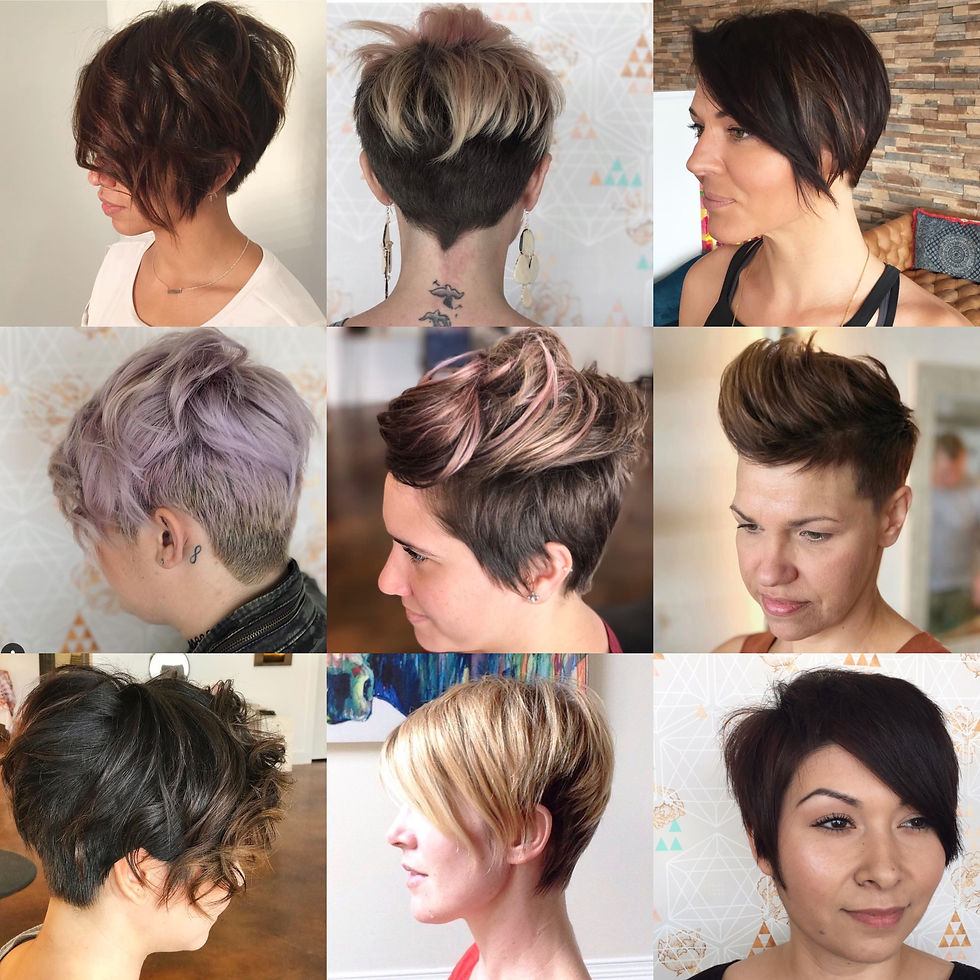
Another great way to communicate with your stylist is asking them for pictures of similar cuts they have done, that way you can pick out different parts of those pictures and that stylist will know the exact technique they used. I would start that conversation like “hey, I’m thinking of getting something between a cropped pixie and a micro bob, do you have pictures of short cuts that you’ve done?”.
The pictures to the right are all cuts that Michele has done on other clients, ideally you would want to see a variation of similar cuts to what you are looking for that your stylist has done.
Things to think and ask about…
Scissor over comb vs. clippers - Using scissors over a comb is a technique that allows your stylist to cut the hair in a gradient (fade) and give a similar look of being clippered, but just slightly softer. Now if you want your undercut to be close to the scalp, you will more than likely have to use clippers (although I’ve seen some stylist do a fade down to the scalp using scissors, it takes a lot of practice and is not common). I personally prefer scissor over comb because I feel like it grows out softer and less fluffy.
Razoring - I also like my hair to have some razoring on the top and sides. This is a great technique to use to prevent the hair at your crown from laying too “heavy” and looking bulky. I feel like this also makes for a better grow out.
Dusting - “Dusting your ends” is what I ask for when I want to keep the length, but still give it a healthy cut and feel. This is where your stylist will cut just the scraggly ends off (about 1/4 inch) and it's a life saver if you are trying to grow your hair out because it prevents split ends from traveling up the hair shaft and eventually breaking the hair off.
Neck line - We all have different hair lines and hair growth patterns on our necks. I recommend embracing yours rather than fighting against it. For example, my neck hair grows in towards the center, leaving a little ducktail which I choose to keep at a point rather than cut straight across. I also have a rather squared neck line. Some people choose to cut the corners off, giving more a ‘V’ look. The decision is up to you- and if you aren’t sure, just ask your stylist what they think! After all, they see a lot more neck lines than we do.
Sideburns - To chop them off, or not. That is the question. I go back and forth with this one. Usually if my undercut is short, I will have Michele edge them up into a straight line. However if my sides are longer or if I am going for a softened look, I will ask her to “point cut” them. This technique takes some of the bulk off of them, but keeps length and movement giving a wispy feel.
Texturizing Shears - these are scissors stylists often use to create texture in the hair while still keeping the length and they are a staple in pixie cuts. I will say that some stylists have their own techniques for creating texture that may not involve these, but most will have a pair in their kit. It’s great for debulking heavy sections of hair as well.
Below I’ve included some of my most popular cuts and colors, and what I would say when asking for each of them.
Bleached out and toned platinum. Keep the hair on the side of the undercut about 2 inches in length, but shorten the nape of the neck with scissor over comb.

Faded the sides down to about a 1/4 inch, leaving a good amount of length on top and edged up the side burns. See how we also squared up my neckline in this cut.
The two collages below are exactly one month apart from each other. One the left is immediately after a cut and bleach and tone. On the right you can see how soft the cut grew out and also how the toner faded over time.


This cut is probably my favorite. We cut the sides and back nice and short so that they didn't feel too fluffy after a couple weeks. Added lots of texture to the top and gave my neckline a slight V. For color we added a shadow root so that I could start to grow out my all-over bleach without a harsh line.

The beginning of the grow out. I decided I wanted to grow my top into a micro-bob this Summer to Fall. This cut and color was what Michele gave me to transition. We cut the sides and back nice and short and she cut the top to shape it for my eventual bob. She also did hair painting to keep my top bright blonde.
I hope this gives you a better idea of what to ask for when heading into the salon for a chop!
Happy hair days to you!
X, LouWho

Your styles have been my inspo for ages. I finally did the thing and love my short hair. I'm just not sure what products help to keep the looks intentional. Any recommendations?
https://keonhacai55.lol/ hôm trước thấy mấy đứa bạn share nên mình bấm vào coi thử cho biết thôi, kiểu xem giao diện có dễ nhìn không chứ cũng không ngồi đọc kỹ hay làm gì. Ấn tượng đầu là trang nhìn khá thoáng, không bị rối mắt, chữ với khoảng trống vừa đủ nên lướt nhanh vẫn ổn. Mình để ý mấy khối nội dung họ chia tách rõ ràng, nhìn phát là biết đang ở phần nào, không bị dồn hết vào một cục. Với lại cái menu đặt khá dễ thấy, chuyển qua lại mấy mục không phải tìm lâu. Nói chung mình chỉ xem sơ sơ vậy thôi mà thấy cách họ bố trí khối nội dung và…
https://keonhacai.cam/ mình ghé thử cho biết vì thấy bạn bè nhắc, kiểu lướt nhanh xem giao diện ra sao thôi. Vào trang cái là thấy bố cục khá “dễ thở”, không bị nhồi chữ hay màu mè quá nên nhìn đỡ mỏi mắt. Mình để ý họ chia nội dung theo từng khối rõ ràng, kéo xuống là hiểu ngay phần nào nằm ở đâu, khỏi phải đoán. Mấy bảng thông tin cũng canh cột thẳng thớm, nhìn lướt vẫn bắt được ý chính chứ không bị rối. Thanh menu đặt khá dễ thấy nên chuyển qua lại cũng nhanh, không phải bấm thử nhiều lần. Nói chung cảm giác dùng ổn vì các khối nội dung và bảng cột…
kubet link mình bấm vào thử vì nghe hội bạn nhắc suốt. Ấn tượng đầu là layout khá sạch, các mục chia theo từng phần nên nhìn phát nắm được ngay, không bị rối chữ. Nội dung thì chủ yếu giới thiệu về nhà cái, có nói tới kinh nghiệm hoạt động ở thị trường Việt Nam và cách vận hành, đọc lướt thấy viết vừa phải chứ không kiểu phóng đại quá đà. Trên điện thoại cuộn trang cũng ổn, tiêu đề nổi bật nên tìm đoạn mình cần nhanh. Nói chung cảm giác trang được sắp xếp “ngăn nắp”, theo dõi dễ.
This was such a helpful breakdown, Sarah! Communication with a stylist really does make all the difference, especially for pixie and undercut styles. For styling at home, I’ve found that a Glow Wave heated brush makes it super easy to add texture and shape without too much effort. Loved your tips on razoring and dusting too!